Ok so I nearly gave up on the curved shooter lane. I really wasn't liking how inconsistent it was shooting into the upper left. I'm talking my target was probably a good 8" span which isn't going to work for a skillshot. Now if I working for a "pinball company", I would probably be told "stop noodling, give up on that feature and move on". If I were a independent pinball builder, I would probably noodle until I ran out of money. Fortunately for me, I have almost no overhead other than my time and some building materials. The playfield sits in a pinball cabinet which sits in an unoccupied space of my house.
So while I was making some minor tweaks to my AMH, I noticed how different the wall guides are on it. The center bar progress lane has a vertical wall, which is mounted by the typical bent screw brackets on the bottom. For the most part this wall is defined by the screw locations, but it can still be bent and tweaked a little. I'm tweaking it because I REALLY don't like how horribly it drains, and as I get it bent towards the left it's been getting better, but still not consistent. I'd say it's about Stern - ACDC bell shot SDTM consistent now. You may ask "Why would you modify the layout? Perhaps that was Charlie's intent, to make that area a drain monster". Yea well for one thing, if you watch Nate Shiver's livestream he did, his almost never drains. And even if it did, I'd still want it to be a little more forgiving since it's my game and I can do what I want. So then I was fixing another area (the space in front of my hellevator seems to get stuck on a rare occasion), so I attached an extra piece of metal flap to the underneath of the ramp so it ensures the ball never gets stuck in that area again. I can see what the problem is, the intent is there. He has a piece of metal that allows the ball to roll down, but the problem is that it's not flush with the rubber post at the end, so if the ball lands just right it'll just stick there. Another thing I noticed, he's using a horizontal wall in this space, not a vertical one. Not like I haven't seen designers use this technique (you see it on more SEGA's and modern Sterns), but since I"m mostly a classic Williams guy I mostly see the typical vertical walls brought over from EM days.
So why do I bring all this up? Well, there's something to be said about horizontal guides vs vertical ones. It comes down to forces, and resistance to them. It's like the difference between bonking someone over the head with the flat edge of a knife, and the sharp end. The sharp end isn't going to flex out of the way. I know, this is all basic physics, why am I acting so dumb? Often times design can get blocked by what you know, and it over influences your judgement. So anyway, I went ahead and fabricated a chunk of steel horizontally in the shape I think I needed, adjusted it a couple times, and just held it about half an inch off the playfield in front of the shooter lane (I have spacers and screws coming from McMaster tomorrow, but I really wanted to prove it out tonight). Know what, it works.. Shot is pretty darn consistent (so long as my plunge is reasonably the same, which is just slightly shy of full power). If I go full blast, it might skip over, or power into the VUK. I could leave it that way and force players to not just go full force, or I could always put a weaker spring in. So that's the other thing I've noticed, the ball barely got up into the corner before, now it's flying up there with ease. Again going back to physics, the less ball contacts surfaces, the less friction (probably helps that there's no loss from flexing of metal either now that it has a hard stop).
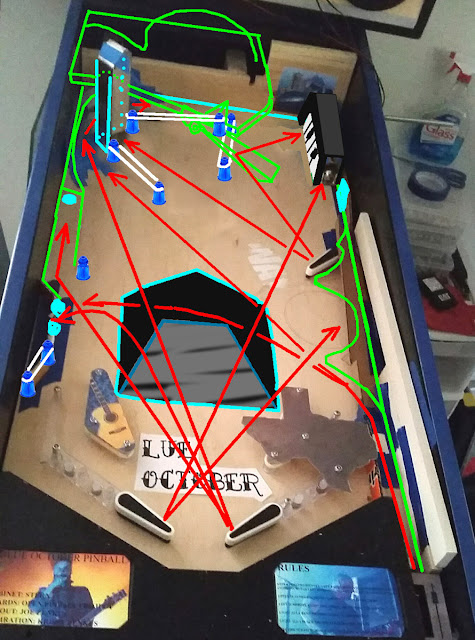
So now that I'm confident I can get the skillshot I originally intended, I took a photo I had in my phone of the playfield (still shows a ramp that just brought the ball above the record and up to the piano with no skillshot involved), and drew over it with a separate layer in case I needed to make changes. So most of the shots are the same from before. I'm making the keyboard in the upper right flat (not a hill). The flat captured ball on freddy seems to work fine, and it'll help slow the ball down more than if a ramp sends the captured ball flying back at the playfield ball. Also since this is now flat, I can make the left side of it part of the plunger skillshot (hitting targets shaped as the keyboard keys). This also gives the mid right flipper another shot. Bounce it off the rubber between the posts to ricochet a shot into the keyboard. I'm also opening up the VUK tube on the backside (so only 2 walls will remain). Seems like having an opening in only one side made it very difficult to aim, and I can use posts and rubbers to contain the ball. I'm going to have to tweak (or possibly make yet another upper playfield) to make the exit violin neck ramp work. I can't have an exit ramp overlap the shot into the VUK because it'll block it. So it's going to need to change angle from 45 degrees at the VUK, to something like 30 degrees so the ramp ends up tilting out of the way. About the only section I'm not crazy about is the dead space in the triangular area (between the back alleyway and the VUK). Since I have another 8 channels from the 2nd board from Hugh (at least one will be needed for the lower playfield if not 2), I can always still throw on a pop bumper or two. It might work well having it near rubber walls. It'll be sort of like what Charlie did on his (Pinball zombies from beyond the grave) layout.