Friday, June 20, 2014

Got wood?

After building about 9-10 six inch wide boxes for our square garden (potatoes have been growing like gangbusters), I'm getting pretty comfy with the saw.  Today I went ahead and sanded the edges of the playfield and it cleaned up nice.

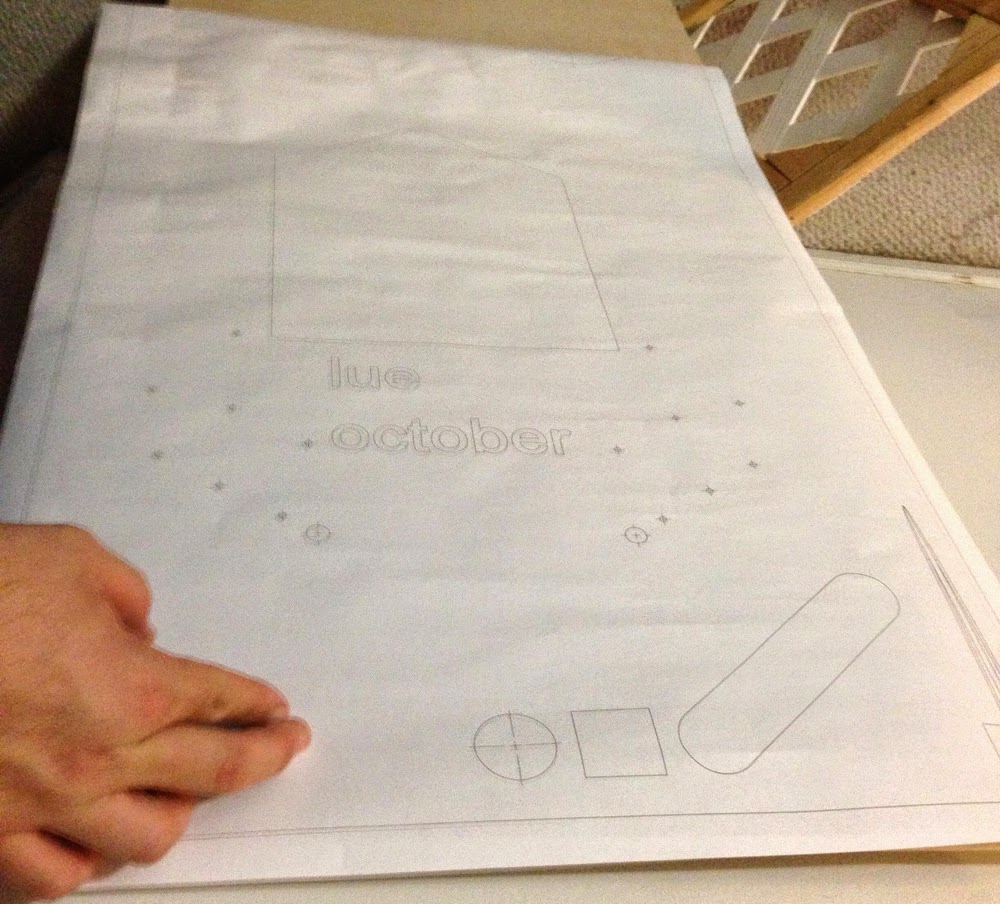
 I printed most of the playfield art on the plotter at work so I can overlay it to get my hole positions.
I also cut the outer box for the new backbox, and added radius to the outer edges using my router.


I'll get the speaker panel cut tomorrow, I simply ran out of sunlight today.

I've also started shopping around for a violin for the playfield.  Looks like I want an 1/8 scale (about 5" wide).  I can buy one on ebay (natural wood, or a variety of colors including purple) for $30 + $18 shipping.  That isn't bad considering it's a REAL violin.  Maybe not top of the line, but it's fully functional craftsmanship.  Still going to hunt for something a little cheaper, maybe I'll run into a used one.  Also been thinking I should remove all the strings, paint strings back in on the middle, but then make some wireform walls out of stainless (so it still looks like strings that blend in, but it keeps the ball from falling off the side).
 

Wednesday, June 18, 2014

backbox

Ok so something I haven't talked about is what is going to be driving this pinball.  I was originally going to use the original Stern guts, but I made a friend that's helping me out (big time), and he's donated (I'm going to pay him whether he likes it or not) a prototype starter kit to drive solenoids, keep score, and eventually display scoring on a monitor (just like OZ baby).  This is far beyond what I thought this project would turn into.

So I decided I should probably start shopping around for a monitor just so I have it ready when I need it.  I started looking at 24" monitors figuring that should be big enough.  Then I went and actually measured the head I have.  It's fricken 30" wide!  Yea, that's 28.5" of backglass width, they didn't give a crap about size back then.  So then I'm thinking even if I go with a 27" LCD, I'm still going to have gaps on the side.  If I jump to 32" not only is it going to start getting expensive, it's not going to fit in that backbox (shy by 1/2-1"), and it seems to be overkill considering it's just scoring.  Then I started thinking so I just want the LCD to display basic digit scoring only (pop a 19" monitor 1/4 of the way up an opening in the backbox), and then still have a traditional backbox backglass with static backlighting?  I could, but then I'd be under utilizing the potential of the system.

I took a good look at the inside of the backbox, filled with everything I don't need inside for this project.  I looked at how the backbox was constructed, and it's literally just a basic box made from plywood with a couple holes in the bottom to mount the bolts to the threaded inserts in the bottom cabinet.  So I said "That's it!  I'm building a custom backbox!".  Why the hell not, that way I can make it exactly the width I need it to be so there's little to no border around the monitor.  My cabinet is 22" wide, the 24" monitor is going to be 22" wide:
AMAZON

Making the backbox 23.5" outer width.  Yes, that only leaves 3/4" inch of gap on each side for flipper button pusing if the backbox is flush against 2 other pins, but who says I can't have some gap?  I can also make the backbox lighter so it's easier to transport (if I ever end up taking it to shows), maybe even modernize it a bit.  I mean the donor cabinet is from early solid state days (no sounds but chimes in the lower cabinet), so there aren't even spots for speakers in the backbox.  Hell, since I have the space (monitor height is only 16") I think I'm going to put some decent speakers above (another thing I need to start shopping for now).
I went ahead and pulled the trigger on an amp and a set of speakers.
http://www.amazon.com/gp/product/B0049P6OTI/ref=oh_details_o00_s00_i00?ie=UTF8&psc=1
http://www.amazon.com/gp/product/B0037Z1FOU/ref=oh_details_o00_s00_i01?ie=UTF8&psc=1

I figure for $42  I can't lose.  Both have good ratings, and the amp is used a lot on virtual pinball cabinets.  It has that new T-class chip amp which is supposed to give you really clean sound.  The speakers are 3-way which mean they provide both tweeters and a mid-range sound.  I'm sure it's way better than any stock pinball speaker system (other than flipper fidelity or Stern).

Thinking about covering the speakers with a breathable panel (so sound comes out), but adding a decal to make it look like an amp:


Friday, June 13, 2014

alright time for a playfield update

Lots of things have changed.. The upper playfield is much smaller now, it's one flipper instead of two.  Because I made an orbit on the lower playfield, I had to temporarily nix the stairway that brings the ball up there.  There is going to be a down ramp that's shaped as a violin (the band uses it in their music).  Because I gained a solenoid channel, I'm adding a 3rd flipper at the end of the right orbit to hit other shots on the left (not there yet).  The lower playfield has been switch from flippers to a guy rowing the boat (think Congo).  There's still work to do, but it's finally feeling like I have flow.

Wednesday, June 11, 2014

Doing some electrical calculations

So I've got some background in electrical.  I worked for a battery charger company for a little over half a decade.  They used both copper and aluminum wiring, and in my experience aluminum is approximately two-thirds as conductive as copper is.

Trying to see if how feasible doing wiring via a flat sheet is.  Typically the thickest wiring you'll see in a pinball machine is 18AWG, which has a stranded diameter of .048", or or an area of .0018".  If I want to run with aluminum, I need about .0030".  If I use .012" thick alum. foil, I can achieve 18AWG conductance at only 1/4" width traces (for high amp), and although 1/8" width is probably overkill for low power and signal, I don't know that I'd want to go much narrower than that.

I can buy a .012" x 20" wide x 5 foot sheet of aluminum off Mcmaster for just $19 which is not bad at all.  I could probably cut it myself with scissors, but I may just have it waterjetted depending on how complicated my electrical layout gets.

Tuesday, June 10, 2014

Class got boring this afternoon

So I'm taking a green belt class for work.  If you don't know what that is, it's about eliminating waste in production (lean manufacturing).  The process is pretty interesting, and it's a great tool to learn.  Problem is, sometimes people ask dumb questions, or the teacher will spend far too much time on something that should be obvious to most students (like basic computer skills).  So rather than daydream, typically I'll keep my mind churning by putting it to work on my own personal projects (while still paying attention).

While green belt is really more about fixing existing processes (not a design), it does talk about non-value added waste.  This can be physical waste (un-necessary extra parts), or waste of time (extra steps, un-necessary labor).

So I'm thinking about the assembly of a pinball machine playfield.  I started simplifying all the parts that are needed:

Electrical: switches, solenoids, flashers, GI lighting, insert lighting... All of that requires a lot of connections to carry power and signals.

Mechanical: Posts, ramps/wireforms, guides, flippers, pop bumpers, plastics, spinners, targets, bash toys.

Now I've shopped a few pins, but never did a playfield swap.  This is mostly due to the fact that dis-assembling the under playfield is a fucking nightmare.  Seriously, the idea of unsoldering wires, unscrewing 30+ bayonet sockets (more so on older titles), all the mechs like flippers, drop targets, stationary targets, spinners, all the T-nuts.  Really I might be able to get past all the mechanical things, but that wiring harness.  If you've ever had to trouble shoot a switch or a lamp, it's a nightmare.  It's almost equivalent to an IT person troubleshooting a Cat-5 cable in a rats nest of a server.  Sure, there's colors to help seperate each strand, but often colors are re-used, and then there's the issue of wires overlapping in a giant bundle.

So then I think, do I go the way of jersey jack?  Do I impliment daughter PCB's?  That's costly.  I mean not really, in volume pcbs (single side anyway) are like pennies per square inch.  But that requires software, and volume parts (I'm making a one-off here).  So then I thought could I do it a simpler way?  I mean for lighting I'm going all LED, I only need enough gauge to carry 3-6V at like 20mah a piece.  I probably make home fabricated pcbs from conductive ink on non-metal material like fiberglass, or even some thin plywood.  Or maybe I do some sort of very thin metal, mask it off, and etch away what I don't need (creating a crude single-sides PCB).  Then I thought why stop at lighting, could I do a layer of switches?  Could I also mount solenoids on this layer?  Could I mount all the posts and ramps on a thin layer of clear plexiglass on top as well (with maybe the exception of a few switches tied to ramps, but this could be connectorized).
This would effectively make it possible to completely strip all components off of the playfield itself by stripping off these 3 layers.

That means shopping out a playfield is no big deal.  This means if there's an issue, that layer can be separated and troubleshooted on it's own.

Another deep thought I had was the insert lighting.  This is another relic that's been carried over from pinball from the 1950's.  Don't get me wrong, watching inserts pop with light is great, but is the reward worth the effort?  Inserts were made because there was originally no way of displaying information (segment displays/DMD's),or implimenting billboards (IE a lexan sign above the entrance of a ramp with LED's using a lamp matrix to simplify wiring).  I think a lot could be communicated off the playfield using alternate lighting.  Heck, for targets it can be backlit, even using multiple colors.  Why am I so against inserts?  They are a pain in the ass both from a maintenance standpoint and installation.  Shaped inserts require CNC, and the recess needs to be somewhat precise so that insert lies flush on the top (with a little sanding), and then there's the glueing to keep them in place (while making sure they don't cloud up).  Over time, inserts become dirty (blocked by the pain in the ass bayonet sockets), the inserts become cupped or stick out over time, sometimes they even crack requiring replacing (if you can even source a replacement).  RGB strips seem to be slowly creeping into pinball to add extra flash.  They use them for under cabinet lighting, in some cases they completely overlay RGB strips over the backbox lighting because it's simpler, and makes it easy to install an existing pin.

Sunday, June 8, 2014

Good lord it's June already??

Life's been busy.  Traveled one weekend to Tennessee, spent the next weekend rebuilding the garden, spent the weekend after that at a friend's funeral.  Well, I got exciting news for you.. I cut the plywood for the playfield:
Told you it was exciting (NOT).  I mean, I basically took a 2' x 4' piece and trimmed it down to 45" long x 20-1/4" wide.  My first cut ripped the edge pretty bad (glad I started long at 46"), then remembered back to my wood shop days that adding some masking tape holds it together.  I had to stop mid-way on the long side, which created a slight jagged.  I'm figuring I"m gonna have to sand the edges no matter what.

I left a 1/8" gap on each side which sounds like a lot, but I'm also intending to add side rails into the playfield (photos later).  Basically imagine mirror blades made from 1/16" aluminum permanently mounted to the side of the playfield rather than the cabinet.  If there's one thing I hate in pinball it's how tight playfields are from the cabinet, which inevitably causes scratches to happen.

Once I get the wood sanded down, I'm going to start populating the basic parts.  Probably going to export my solidworks layout to paper 1:1 scale.

Saturday, May 3, 2014

An update that isn't really an update

So I've been slowly working on my layout.  I'm adding stuff, then realizing I still have dead space.  After being spoiled by Pat lawlor tables, I feel like mine needs to attempt to live up to that standard, so some things may need to be further tweaked.  I may have to add a 3rd flipper mid playfield, no wonder why Pat always did that (only so many angles you can shoot on a fan layout).
One thing almost for sure that will change is the 2nd floor playfield, I'm going to try to change this to clear (Polycarb) so I can have useable and viewable playfield space below it instead of just a bunch of blind tunnels.  Supposedly a design that Trudeau worked on was going to try this, and after seeing the "clear EM pinball" project on pinside I figure I can at least do that on a small portion.
I don't know if any of you have heard my latest skits on the pinball podcast, but I've been starting to do audio "theater of the mind".  My first one was the big lebowski, and the next episode I'll be attacking spaceballs since a pinside user is actually creating one.  The audio is done, it's just a matter of Don and Jeff editing the show together.  Not only is this fun to record, but I'm realizing this is a really great way to sort of storyboard a theme.  By listening to applicable soundbites over and over, your mind starts imagining how that could tie into something in the playfield.
Out of all the ideas on pinside, there are currently 3 that really excite me:
1. Beastie boys - this band did a LOT of sampling, and those short little soundbites would make for some really fun pinball.  Also because they're famous for record scratching (mixmaster mike), I thought it would be really cool if there was a dual turntable in the middle of the playfield (think whirlwind spinners), but they could rotate back and forth (like scratching) instead of just spinning in one direction.
2. Weird Al - I'm not sure how the theme would really work, he's parodied so many things over the years, from his songs to his UHF movie, but the artwork alone would be incredible (some of his early album covers were pretty colorful).  Al is a stickler for proper grammar, so there would have to be some grammar mistakes on the playfield with a sticky note from Al correcting it.
3. Van halen - This is the epitamy of music themes to me.  If any company decided to tackle this, I would sell whatever I had to in order to buy it.  Seriously, there are very few bands (pink floyd is another) where I can drag any song into a playlist and I'd probably be happy to listen to it.  I already have a few ideas of features (and toys) I'd end up incorporating into this theme.  There's 2-3 really great songs to use for attract mode.