Sunday, July 24, 2016

don't like it? 3D print it!

So I'm really not liking how the flow is going with my current layout, plus I feel like it needs that a hook that makes it different enough.. not (oh look, stock parts on the lower half).

So here's my new plan.. and it's based on the fact that cutting playfield geometry on a playfield sucks so I'm trying to eliminate as much of it as possible when I start fresh.  That includes cutting the groove of the shooter lane, the complicated  cutout of the old single ball trough I have.  I also don't want to restrict myself to the geometry based on off the shelf parts.  That being the ball trough and the stock williams or SEGA lane guides.

1. Ball trough - I'd like to 3d print this.  This allows me to control the ball path.  The trough itself costs me about $4 to print (once I design a scoop to direct the ball into the shooter lane), but of course I also have to add switches, and a vuk coil.  It will still be far more cost effective than off the shelf, and based on the initial sample I printed, I don't see any issues of it breaking or wearing (at least not on the low plays a homebrew pin will get).  If it does break, I can always reprint it.
2. Inlanes - outlanes - You'll notice I have 2 inlanes and an outlane on each side.  That's accomplished by making the shooter lane also the right outlane.  If someone should plunge light and drain, I'm certain I can include script that says "if player scores nothing, give the ball back".  You'll also notice the lanes look strange.  In order to optimize enough space for this many lanes, typically Stern has to go back to wireforms (those U-shaped things that shove right into holes on the playfield).  This takes precison, and even when you have precision it's a pain to stick those in or take out when you need to shop out a playfield.  My design mounts from the top using the 3 posts from the slings.  I 3d printed a single piece (which in itself isn't terrible, but the walls are slightly flimsy).  On the real version I intend to use PETG sheet on the top, and the walls will be bent pieces of aluminum that will secure using screws.  I'm expecting this to be plenty stiff, especially if I anchor the cottom corner.
3. Apron - Though you can't really see it now, I'm going to be borrowing the design from Bally Spectrum.  It technically has no apron, it simply has walls, and then a piece of plastic shaped like an apron that mounts to bosses.  I like this for 2 reasons:
  A. It means you can have the apron off, and still function because all the walls still remain
  B. The top just being a cover (which is clear), I can print whatever decoration on the inisde

So the left outlane now becomes a direct path to the lower playfield, and it comes back up a hole next to the ball trough.  I'm going to start cutting this new lower half soon.

Wednesday, July 20, 2016

Fresh Start

Been thinking about this project a lot.  Lots of ideas going on, just need to get them down on paper.  No I'm not throwing out the baby with the bathwater (lots of concepts will carry over), but I might be cutting a new playfield.  More to come soon...

Thursday, May 19, 2016

long time no blog

I haven't given up, I promise.  Lot going in my life lately.  Did a ton of work on the house because we were getting it appraised to refinance.  Things I should have done long ago all stacked up, but I got most of them done and the appraisal is over with.  Combine that with staying busy with mods.. Not only am I helping work on mods for Mezel Mods, I'm getting contracted directly by Sparky (who has a big backlog for his stuff, but I'm not going to say no to easy money).  Heck, just last week I had a guy from the next town over contract me to model up a mounting bracket for a tanneau cover for his pickup (apparently the part doesn't exist anymore).  Couple hours of modeling and a quick print and I'm $40 richer.   He found me because I made an account on makexyz.com (local 3d printer vendor list).  None of this is going to make me rich, but it's sure nice to have a side job to fund things.  I also have a backlog of LCD mods, of which I cannot really work on until they start shipping raspberry pi zeros (should be anyday now).  They had to move their factory to another facility to keep up with demand since the pi3 is also selling really well (and has slightly higher margins).

Anyway, now that I'm catching up on things I'd like to get back into this.  I've tried to sell my treadmill to make more space, but I refuse to sell it for the $100 people are offering on craigslist (I originally paid $1200 and it's barely used), so that may be staying.  However, since the house is clean and purged of useless stuff, I may be putting a rocking chair that's taking up space down here upstairs in the library.  It belongs to my wife, but it used to belong to her grandmother.

After hearing the interview with Mission pinball (boom go podcast), I really want to try this framework out.  I've watched videos in the past (getting demolition man up and running in a couple hours), but hearing in depth talk of it makes it more clear what it does and what it doesn't do.  Hugh shipped me the latest rev2 boards about 3-4 weeks ago, and I hate to see it just sitting there.  I still need to tweak my layout a little but I have some ideas.  Also I came up with a way to make quick wireform ramps using 3d printed brackets:
https://www.youtube.com/watch?v=w2ocsm5AkkU

Monday, October 19, 2015

Expo review

Since I'm still working on my layout (and don't want to show a partial update), I'll go ahead and talk about Expo a little.

So there's 2 parts of Chicago Expo.  There's the Expo that's at the Westin in Wheeling, and then there's the extended party at Terry's at pinball life on friday from noon-6.  So being that I live literally 4 miles from Pinball Life, I often find myself there buying parts (or lately, buying 3d prints from Scott Danesi for some LCD mods I've been doing for some small side income).  So this was the 2nd year in a row that I brought a pinball to a show, both being Pinexplosion.  I've heard nothing but bad stories about what a hassle it was bringing a game to expo, or hassle getting wristband refunds from Pacak.  Terry: I drive 4 miles down the road, drop off my pin on a friday weeks before the show at my convenience (not driving 20 miles on a Wednesday night).  First year was nice, I brought elivra, it sold so I didn't have to drag it back.  This year I brought Freddy, nobody was interested (at least not at the price I was asking), so it's coming back.  I'm putting off picking it up because upstairs is packed with 3 pins in the front room (AMH, my newly picked up space station, and the blue october project).  My goal is to wait until October 30th, bring freddy home and stick that and space station in the garage so trick or treaters can play it during the day on Halloween as they come by.  I've seen other people on pinside do it, and being in Chicago it's not normally warm enough to do that.  Well this year seems like it's going to be a mild winter in the midwest (high temps in the low 60s), so even if I have to put a heater out there, the pins will be on.  I'm going to have to get a step stool so the small kids can reach the buttons and see the playfield.  I haven't had time to decorate this year, but hopefully I can at least get some purple or red lighting backlighting the pins, and hide some of the garage with cotton spiderwebs.  Like many others, I don't want to see pinball die, and if I can create an impression on a kid to want to play them later in life, I've done my job.

Pinexplosion was even more packed this year, not surprising since there is no price of admission, there's free food and beer/soda, and 50 pins on freeplay (plus deals on parts).  Expo, well.. I mean, freeplay area.. yea that was pretty bare this year.  I know Expo isn't mean as a show about playing pinballs, but seeing how there really wasn't any announcements this year (Stern game of thrones was announced early, Hobbit still isn't shipping, Lawlor's title isn't announced until next Spring, Spooky is still 3 weeks from revealing rob zombie), Pinball circus is still in development.  So unless you're interested in going to seminars, what does Expo really offer for $25/day?  One thing I like seeing lately at Expo are the homebrew projects.  I come to find that there's actually 2 Buffy the vampire slayer machines (rethemed swords of fury with new software).  At first I was sort of upset that two of this great game were sacrificed for this project, but after playing them I can appreciate it.  I mean the code is great (sound cues where to shoot), great graphics, the upper left playfield is transparent so you can see underneath.  Nightmare before christmas had great flow, though talking to the owner he did say he had ball detection issues not from hardware but some bug in the latest mission pinball framework (that was being worked on up until the moment of the show).  I actually saw Ben heck and Charlie walk over to this machine and talk to the owner for about 10-15 minutes early saturday morning.  He had the playfield lifted up, and it was as if Ben was just curious how a hobbyist chose to wire it up (lights, boards, etc), and generally what the latest FAST hardware looked like.  Peanuts pinball (which Aaron is working on) had a half populated playfield (with art) which is impressive considering about the only thing done on it the week before was flippers and a ball trough (he did a livestream).  For a while he had the playfield lifted up.  During the stream you could see that he just had the playfield out sitting on some sort of frame he welded up.  At the show you realize this is not a temporary frame, but rather a frame that stays with the playfield, and it rests on rails in the bottom.


This is actually quite genius in a couple ways:
1. It gives you a nice platform for the playfield to sit on, sort of a built in rotisserie (both for building it, and future servicing).
2. In reality, it doesn't need the hooks to attach to the lockdown bar, it could just rest at the bottom if you had something to lock it in place.  Then the only thing you'd really have to lock is the glass in place.

The other crazy part about these 3 projects (muppets was barely started) is that the father of Aaron built all these cabinets.. like not kit form, but actually built them from bare plywood.  I realize there are companies like churchill that do this everyday, but it's more amazing for a home builder to do it with minimal tools.

So one thing I'm starting to realize, gottliebs have really good flow (and some pretty neat innovations).  Freddy plays pretty good, and not a single entry ramp (which is odd for 1994).  Waterworld also has entry no ramps (but it does have return ramps, including one that pivots), and has a neat boat that spins 180 degrees to enable ball lock, and also dumps the balls after they've all been locked.  It also has this nice flowing side loopback on the right.  Nothing innovative there (games like skateball had it), but nice that they implemented it.  You look at "lights camera action", and they implemented a somewhat large chunk of playfield that spins and completely changes that layout in that section (almost increasing the playfield size in a way).  That's the sort of flow I'm aiming for, the ramps are just icing on the top (and need to be lastly implimented).  The main gameplay is on the main playfield.

Thursday, September 17, 2015

stand up target cherry switch - 3rd entry

Ok, so I started with a cherry roller switch for the ball troft drain, then I made brackets to mount cherry switches for the flipper buttons.  Now I just made my first cherry switch standup target:

It's a simple 1/8" x 1-1/2" aluminum angle bracket that I cut down to size, added some holes to mount the switch, and added 2 holes for mounting the bracket to the underside of the playfield.  There's really no side force, it's all inline force from the ball hitting it so I didn't feel like I needed the screws off to the side.  I had to drill a hole in the metal contact on the switch in order to mount the target face, but it wasn't terribly hard.  I made the face from polycarbonate (I may make them in the future from PETG, polycarb even in 1/16" thickness is not fun to cut), but this should hold up well.  I'm considering leaving it clear because I think rather than adding an insert in front of the target (which always wear bad), to simply backlight the target when hit (have a bulb socket mounted underneath it).  This should be much cleaner.

The aluminum channel is from mcmaster, I think I paid maybe $10 for a 2 foot long piece (only need 2" per bracket).  The switch is from allelectronics, and it handles up to 15A for just $2 each in quantities of 10 or more:
http://www.allelectronics.com/make-a-store/item/sms-196/spdt-snap-action-switch-w/lever/1.html

I've got 4 brackets total made so far, most likely going to use these for the keyboard first.  I've made pretty good progress on my layout, but I want to get further along before I do a playfield update.  In fact it's flowing so good, I think I had about a 5 minute ball time before I drained, and it didn't get stuck on anything.

Monday, September 14, 2015

Layout tweaks with photoshop

Ok so I nearly gave up on the curved shooter lane.  I really wasn't liking how inconsistent it was shooting into the upper left.  I'm talking my target was probably a good 8" span which isn't going to work for a skillshot.  Now if I working for a "pinball company", I would probably be told "stop noodling, give up on that feature and move on".  If I were a independent pinball builder, I would probably noodle until I ran out of money.  Fortunately for me, I have almost no overhead other than my time and some building materials.  The playfield sits in a pinball cabinet which sits in an unoccupied space of my house.

So while I was making some minor tweaks to my AMH, I noticed how different the wall guides are on it.  The center bar progress lane has a vertical wall, which is mounted by the typical bent screw brackets on the bottom.  For the most part this wall is defined by the screw locations, but it can still be bent and tweaked a little.  I'm tweaking it because I REALLY don't like how horribly it drains, and as I get it bent towards the left it's been getting better, but still not consistent.  I'd say it's about Stern - ACDC bell shot SDTM consistent now.  You may ask "Why would you modify the layout?  Perhaps that was Charlie's intent, to make that area a drain monster".  Yea well for one thing, if you watch Nate Shiver's livestream he did, his almost never drains.  And even if it did, I'd still want it to be a little more forgiving since it's my game and I can do what I want.  So then I was fixing another area (the space in front of my hellevator seems to get stuck on a rare occasion), so I attached an extra piece of metal flap to the underneath of the ramp so it ensures the ball never gets stuck in that area again.  I can see what the problem is, the intent is there.  He has a piece of metal that allows the ball to roll down, but the problem is that it's not flush with the rubber post at the end, so if the ball lands just right it'll just stick there.  Another thing I noticed, he's using a horizontal wall in this space, not a vertical one.  Not like I haven't seen designers use this technique (you see it on more SEGA's and modern Sterns), but since I"m mostly a classic Williams guy I mostly see the typical vertical walls brought over from EM days.

So why do I bring all this up?  Well, there's something to be said about horizontal guides vs vertical ones.  It comes down to forces, and resistance to them.  It's like the difference between bonking someone over the head with the flat edge of a knife, and the sharp end.  The sharp end isn't going to flex out of the way.  I know, this is all basic physics, why am I acting so dumb?  Often times design can get blocked by what you know, and it over influences your judgement.  So anyway, I went ahead and fabricated a chunk of steel horizontally in the shape I think I needed, adjusted it a couple times, and just held it about half an inch off the playfield in front of the shooter lane (I have spacers and screws coming from McMaster tomorrow, but I really wanted to prove it out tonight).  Know what, it works.. Shot is pretty darn consistent (so long as my plunge is reasonably the same, which is just slightly shy of full power).  If I go full blast, it might skip over, or power into the VUK.  I could leave it that way and force players to not just go full force, or I could always put a weaker spring in.  So that's the other thing I've noticed, the ball barely got up into the corner before, now it's flying up there with ease.  Again going back to physics, the less ball contacts surfaces, the less friction (probably helps that there's no loss from flexing of metal either now that it has a hard stop).

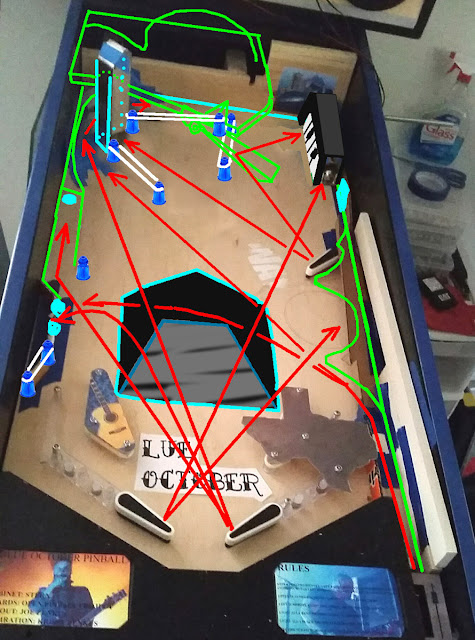
So now that I'm confident I can get the skillshot I originally intended, I took a photo I had in my phone of the playfield (still shows a ramp that just brought the ball above the record and up to the piano with no skillshot involved), and drew over it with a separate layer in case I needed to make changes.  So most of the shots are the same from before.  I'm making the keyboard in the upper right flat (not a hill).  The flat captured ball on freddy seems to work fine, and it'll help slow the ball down more than if a ramp sends the captured ball flying back at the playfield ball.  Also since this is now flat, I can make the left side of it part of the plunger skillshot (hitting targets shaped as the keyboard keys).  This also gives the mid right flipper another shot.  Bounce it off the rubber between the posts to ricochet a shot into the keyboard.  I'm also opening up the VUK tube on the backside (so only 2 walls will remain).  Seems like having an opening in only one side made it very difficult to aim, and I can use posts and rubbers to contain the ball.  I'm going to have to tweak (or possibly make yet another upper playfield) to make the exit violin neck ramp work.  I can't have an exit ramp overlap the shot into the VUK because it'll block it.  So it's going to need to change angle from 45 degrees at the VUK, to something like 30 degrees so the ramp ends up tilting out of the way.  About the only section I'm not crazy about is the dead space in the triangular area  (between the back alleyway and the VUK).  Since I have another 8 channels from the 2nd board from Hugh (at least one will be needed for the lower playfield if not 2), I can always still throw on a pop bumper or two.  It might work well having it near rubber walls.  It'll be sort of like what Charlie did on his (Pinball zombies from beyond the grave) layout.
Friday, September 4, 2015

getting back on track

Ok so it's been a crazy couple of months.  I bought a freddy about 6 weeks ago, shopped it out, built a custom topper, and designed an LCD mod that runs off raspberry pi (movie clips play on a TV in the corner).  Then a couple weeks later, I find a deal on a street fighter.  Shopped THAT out, also currently building an LCD mod (SF2 cabinet 3d printed, runs off 5v in the backbox).  So THEN, my AMH finally finishes being built, and that's been played to death (it's currently upstairs).  Well just last night, I finally cleaned up my blue october area.  I had tools and parts lying all over the ground underneath and in front, sandpaper and various parts sitting on the playfield.  I brought some plastic bins that weren't being used up from the basement, and put nearly everything away, and now my area is clear again to continue working.  Last time I left off, I was veering away from the curved shooter lane and building a ramp to go over the record player area.  I still want to somehow implement a skillshot.