Well it took 2 weeks, but someone finally contacted me to take my old cabinet. Guy from Milwaukee picked it up. He plans on making a simple early solid state game (no graphics, just scoring). His ideal theme is Kraken (assuming that's pirates?). He's got PROC hardware already and is going to use mission pinball framework. He's good mechanically, but sucks at programming (like me) but apparently has a friend that's going to take care of that part for him. He even stipulated "If this cabinet doesn't work out, you ok with me passing it on?" and I'm like "Oh yea of course, I get it. I'm on my 3rd cabinet now.. I get how projects can change. I hope you do pass it on so someone else can start a project".

Wednesday, December 23, 2020
Sunday, December 13, 2020
Do pinball enthusiasts even want to start building their own pinball machine?
I did a little cleaning in my basement (we had some purging, plus I wanted it to be clean because someone was buying one of my pins). Now that I have my modern cabinet there's no reason to keep my old F14 cabinet (it's just taking up space). So I first threw it out to my local pinball club members (about 10 people). FREE FREE FREE, a cabinet with all the hardware you would need for a cabinet for either homebrew or a virtual cab (easily worth a few hundred dollars with used parts), no takers. Ok no problem, I'll stick it in the Chicago sale pinside thread, easily 100+ eyeballs, surely this will go fast. Lots of thumbs up for my post, not a single message of someone that wanted it (and I posted that like 2 weeks ago).
Now, if I had perhaps included a flipping whitewood (48v/12v power supply hooked up directly to some flippers with an end of stroke switch) I'd be willing to bet this would be a different story. Even if they never code it, I'm guessing if you were offering a flipping machine someone might find it fun to start throwing some stock playfield parts, maybe even building some cardboard ramps. So perhaps it's not the cabinet that stops people in their tracks when it comes to starting a homebrew, it's also that they find the electrical portion daunting and don't want to commit to a project.
So I'm at a crossroads. I don't want to just throw a perfectly good cabinet away, yet I don't want it to take up space if it has no purpose. Part of me wants to turn it into an interactive homebrew thing I bring to pinball shows. Have a flipping whitewood running off of a power supply with basic outside walls, then provide a bunch of stock parts and let people play around with it. My only reservation is you can't exactly have the public drilling holes (and turning a whitewood into swiss-cheese), and I don't know if a hot glue gun is safe enough for the public to be messing with. I wonder if I could have some sort of metal top half playfield and each component could have a neodymium magnet on the bottom. That way it's stationary enough to handle a ball knock, but is still moveable.
Tuesday, November 17, 2020
Insert lights replaced with... fiber optic?
So one idea I've had is, could you simply have a circuit board with a bunch of bright LED's, and then feed those lights to each insert via a fiber optic? Well, I decided to buy a short sample of light transmitting fiber optic (do not buy network fiber optic) and see. Decided to start with 3mm diameter, but it could probably easily be 2mm. It came with a small 5mm LED that was about the same brightness as the LED flash on my cellphone. I decided to recut each end, and then flash polish each end so it was nice and clear. I gotta say it's pretty darn close to a bulb sitting in a socket behind the insert.


So you're probably saying to yourself...

Well.. I've seen underneath a lot of homebrews, and the biggest contributor to a rat's nest is the wiring for the lighting. Now granted this simply takes 2 wires and replaces it with a single glass cable, but half is good. So what about cost comparison?
Well assuming you were to JUST buy the same LED bulb, bayonet socket, and simply have a row in a section and then feed the fiber optic over to each insert (you would also probably want to 3d print some sort of holder to keep it offset). Just comparing fiber optic to a pair of 22AWG wires:
22AWG wire, 1000 feet red, 1000 feet black ($80 each)
$160 / 1000 feet = 16 cents per foot
----------------------------------
2mm fiber optic, 350 meters (or 1080 feet) = $90
8 cents per foot
So just in the wiring alone, you'll end up paying about 1/2 the cost. Now if you were to also replace the $1.50 PROC RGB bulb PCB with a through-hole RGB soldered to a perf board (say a neo-pixel), you'd be only paying 50 cents each (plus a little bit for the perfboard).
https://www.adafruit.com/product/2659
That's also adafruit prices, you could obviously find them for at least half that cost on aliexpress.
Another benefit: If an LED goes out, they are all in a single section. Just go to the one not working and replace it.. not brush your way through a nest of wires, unscrew the bayonet socket (and hope you don't drop the screw).
One more benefit: You don't have to worry about crosstalk of 48v coils vs 5v lighting. You are literally carrying the light through a tube, not power.
Saturday, November 14, 2020
3d printed cabinet - part 4 (fixed)
Well that wasn't quite as bad as I thought. There were slight alignment issues with the leg threads I had to adjust. I'd say I spent probably 3 hours taking it apart, cutting off 1" from each piece, and re-assembling.


3d printed cabinet - part 3 (well crap)
So I built my cabinet thinking go ahead and make it standard width (even though my wood is only 1/2" compared to the standard 3/4"). As I start to layout the playfield and glass, I realize if I try to make this work, it will be nothing but a compromise. Unfortunately the playfield glass sort of drives everything. I can't go to a widebody glass because it would hang over the cabinet. With a standard glass, in order for there to be enough support I would need to extend wood on the sides, or have some U-channel (which would still narrow the opening), which would force the playfield width to be standard size (and possibly have the walls next to the playfield instead of on top). Again, this feels like a compromise. I've got a pocket of nothing, for no reason. I even tried arguing that I could have like a built in side panel for art, but not at 1/2" thick.
CURRENT CABINET

UPDATED CABINET

Monday, November 2, 2020
3d printed pinball cabinet - part 2
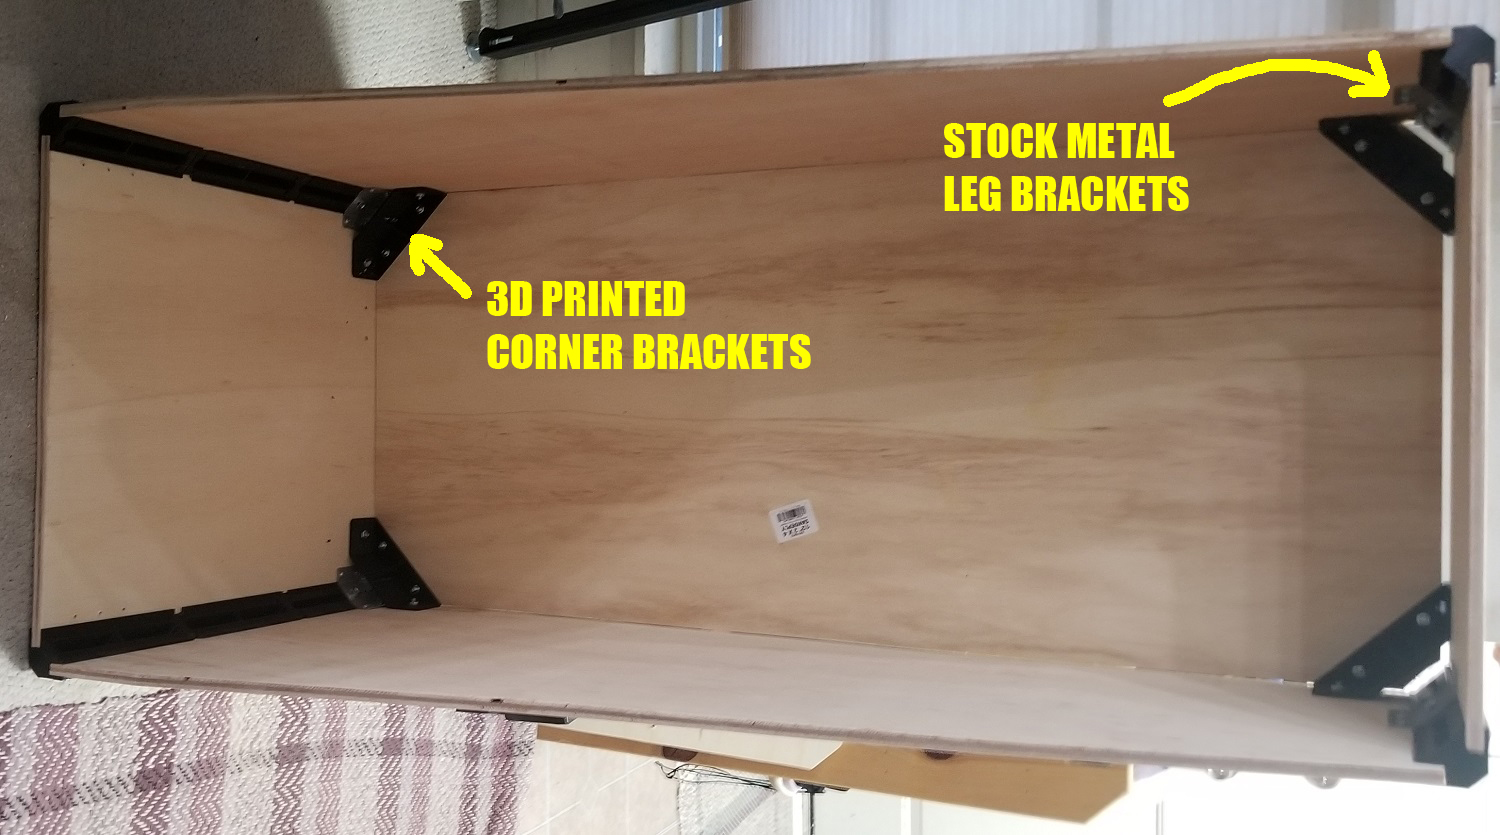
So I was going to use 1/4" plywood for the bottom, but I could see how not stiff it was, so I opted to redo the corner brackets towards the bottom to allow for 1/2" plywood. This also means you are ONLY buying 1/2" ply to build this cabinet. I made another change I'll mention later.
So even though the stock metal leg brackets helped a lot to tie things in, I decided to also design and 3d print some extra corner brackets. I pretty much set the plywood inside the box, laid the bracket in place, marked the holes, and started drilling. Then go to town with 1/4" screws and nuts.
Apparently I didn't cut the sides quite short enough because there's a bit of a gap toward the front. Again, this is me just trying this out so gaps aren't bothering me right now. My next cabinet I'll take my time to make sure things are cut more precise.

At this point, the cabinet felt pretty good, but I knew the center was still not tied very well, so again I designed and 3d printed some more brackets.

So one thing I decided to do is make the hole locations in the front and back different so the entire cabinet leans just a little bit. This means if I decide to make the playfield parallel with the bottom of the cabinet (which I would prefer to do), by default I will have approximately 4.5 degrees. If the rear legs are extended an inch it should reach the standard 6.5 degrees.

Now I'm not going to say this is exactly equivalent to a standard cabinet. It's lighter (which is not a bad thing). There seems to be a feeling of something slightly not tight (but I can't narrow it down where that's coming from). However, I'm very confident that this would hold up to nudging.
Now where do we go from here? Well a few things:
1. I had thought about selling a kit. I'm not sure that will ever work out because the way the corners are designed the tooling would require slides (which would make it impossible to prototype). Me 3D printing them would not be cost effective. Even if I use bigger tips and cut printing time down to 5 hours, I'm still looking at 50 hours (which if I'm charging my standard $5/hour I would have to charge $250) which is starting to creep into real cabinet pricing. Another thought I had, upload the STL files and ask for donations. Another thought.. Upload the native solidworks files, make this open source and make the homebrew pinball explode.
2. I still have a few things to add before this is a useable cabinet, but the hard parts are done. Once I'm able to throw a blank playfield in, I'm likely going to start throwing components in and make a flipping whitewood. I would like my wife to get involved with the project this time, and I figure if it's sitting there waiting to be played she can throw ideas at it.
Based on what I've learned, I may end up designing cabinet 2.0 and perhaps donating this cabinet to someone local that doesn't care if this cabinet has issues. I also need to ditch my F14 cabinet.
Tuesday, October 27, 2020
Custom cabinet - helping other homebrewers (reduce cost of entry)
So I'm semi getting back into my project.. I really like how Hugh tried to make the most cost effective pinball controller possible (so new homebrewers could get into it cheaply). Well I've been tinkering with a cabinet design in solidworks for a while now to cover the other barrier to entry and finally decided it was time to start making something. So let's just go over what options there are:
1. You find someone getting rid of an old cabinet (like me). A friend was dumping a williams F14 cabinet, so of course I grabbed it because it was much better than the crappy early Stern cabinet that was really only good for a single level playfield. But an early Williams cabinet is also semi-limited in space compared to a modern cabinet like Stern. I'll admit I'm not entirely happy with the limitation of it.
2. You buy a virtual cabinet. Fully assembled with hardware you will pay $1350. If you go the DIY route:
$280 lower cabinet
$50 backbox
$130 coin door face (because you have to fill that hole with something)
$20 - stern lockdown reciever bar
$65 - stern lockdown bar
$8 - lockdown clamps
$22 - Williams backbox hinges
$16 - leg brackets
$39 legs
You still need a speaker panel for the backbox, rails for the translite.. But you're already in it for $630 (no wonder why a homebrew is starting to sound expensive)
3. You buy a cabinet from spooky.. Annnd still buy all that hardware.
Option 4. I hope to one day offer this option.
So there's this channel I subscribe to called laser sterling. This guy is from colorado and he's been building a "homebrew lamborghini", and he's 3d printing all the body panels and covering them with carbon fiber. It's not... bad, for what it is (and sort of amazing he's printing it on a small hobby printer in sections and using epoxy to join them), but if you watch his channel for a while, you realize what a fit nightmare it is trying to get everything to fit right and getting consistent body gap.
https://www.youtube.com/c/lasersterling/videos
So it got me thinking, a pinball cabinet isn't that complicated, but cutting everything out (and joining the corners) is sort of an art. You don't have to be an expert cabinet maker, but you sorta need reasonable woodworking skills. So although my cabinet compromises a little artwork, and currently there isn't room for a shooter rod (I prefer an auto launcher to avoid alignment issues), it's VERY simple, VERY cheap, and VERY easy to assemble. I'm 3d printing corner joints so that it makes the flat pieces MUCH simpler to cut. I literally drew the lines to cut my plywood, made my cuts, and assembled this in less than 2 hours:


Now I'm still tweaking the design as I go (I still have a bottom panel and backbox support to install), but I'm pretty confident this will be plenty strong for a homebrew game (even taking to shows).
So the cost? Well even though I haven't ordered all the hardware I need:
$60 - 1/2" plywood, 2x4 sheet x4 (cabinet wood)
$65 stern lockdown bar
$20 lockdown receiver
$3.75 x 2 (latches)
$24 in filament cost for the 3d printed corners and approximately 70 hours of print time
$39 4 legs
$4 x 4 (leg bracket)
$4x2 glass rail channels
------------------
$239.50 total
Haven't quite finalized the backbox (but it too will be simple and cheap), but I'm already $40 less than JUST the virtual cabinet, and I have nearly a complete cabinet. About 4 years back I started to tinker with a 3d printed lower playfield (which I would still like to complete):
Between those 2 things, I figure I could get a flipping playfield IN a complete cabinet for probably less than $500 in total material. That's no logic, no sound.. but it would enable someone to start lying out an idea with minimal investment.
Tuesday, September 29, 2020
deeproot - sparked an idea
So with last week's reveal of what their new cabinet looks like, and their "Revolutionary" pinbar it certainly got me thinking "maybe the cabinet could be different".. Just not how deeproot is doing it. I think that backbox is overlay complicated with far too many pieces. I think the pinbar needs to be flush (not sticking up like they have it now).

But getting back to the backbox, the concept of simply wrapping art around the sides as one piece is intriguing. Also clearly the speakers are hidden away somewhere else. Yes I know there's some speakers in the front of the lower cabinet, but I think that's only on the upper tiers. There has to be upper speakers somewhere, and hopefully not behind the art because it'll get muffled (or they'll do some last ditch fix like poke holes through it).
But it got me thinking.. I like how heighway integrated the screen where the action is (but I don't like having to make sure a screen is flush with a playfield). At that point, the screen on the backbox is redundant (but there still needs to be art). Speakers can be a topper at that point. This also greatly simplifies the backbox as it only becomes a lightbox (2 wires coming up from the cabinet). I've been working on a custom cabinet design and I think the concept of moving the screen down helps me even more. When works slows down a bit, I think I'm going to take some time off and start really getting my cabinet built. I think that'll finally push me into getting back into mucking around with a whitewood.
Tuesday, July 28, 2020
Van halen pinball - Micheal Anthony owns a SEGA twister
This was just posted on a facebook group I'm on called pin spotting. You have to wonder what the story is behind it. Did he buy it new in box? Did he get a discount? Did he buy it used recently?

Subscribe to:
Comments (Atom)